
Introduction
Photography is becoming a favourite hobby of mine, and having kids provides a great opportunity to practice and learn. People have complimented me on my photos, and while I appreciate the compliments, I think that my techniques are very simple and that most people could probably replicate them with a few pointers. Most of this document is going to assume that you are shooting with an SLR, although some of the pointers will apply to point and shoot cameras as well.
Exposure Control
One of the first things that I would like to talk about is the parameters that you have for controlling your exposure. Traditionally, photographers would adjust the aperture setting and shutter speed to get the exposure and the effect that they are looking for. With modern digital cameras, there is actually a third parameter that influences your photographs ... ISO. I’ll talk a little bit about what each of these parameters do, and then I’ll talk about how I personally decide how to set each of them.
Shutter Speed
The shutter speed is a measure of how long the shutter is open when taking a picture. The longer it is open, the more light that is let in (a good thing) but the more likely you are to have motion blur if your subject is moving (generally a bad thing). When setting the shutter speed on your camera, the number you see is typically the fraction of a second that the shutter will be open for (i.e. 60 corresponds to 1/60th of a second). The most important thing about shutter speed is to have it be fast enough to eliminate unwanted motion blur. Once motion is frozen, having a faster shutter speed has very little impact on the photograph.
When thinking about shutter speeds, a very important question is how fast do you need to set your shutter speed to avoid motion blur? The answer to this question depends on many parameters, the most important of which are the focal length that you are shooting at, whether or not your subject is moving, and how steadily you are holding the camera.
When hand holding your camera to take a picture of a subject that is not moving, a very general rule of thumb is that you should aim for a shutter speed of 1 / focal length or faster. For example, if your shooting with a 24-105mm lens that is currently zoomed to 60mm, then you should aim for a shutter speed of at least 1/60th of a second. This number will be influenced by how steadily you can hold your camera and also by the megapixel count of your camera (smaller pixels are more likely to pick up motion blur), so my advice is to use this as a starting point and to adjust it based on experience.
If your subject is moving (as is often the case with children), you will need a much faster shutter speed to freeze motion in the photograph.
Aperture
The next important parameter that you have control over when taking photographs is the aperture setting. Setting your camera’s aperture number (generally known as the f-stop) to a smaller value means that the aperture in the camera is actually opening up wider and therefore is letting more light in. Besides controlling the amount of light, the aperture also has a very important impact on depth of field. A smaller f-stop value will result in a shallower depth of field.
Generally, you need to use a small f-stop number if you either want a shallow depth of field to isolate your subject, or if you are shooting in low light in which case you may need to open up your aperture in order to get enough light to take the picture.
One secondary effect of the aperture that I mostly ignore is its impact on sharpness. When shooting wide open (i.e. with the f-stop number at the smallest setting) will often result in pictures that are slightly soft, and on some lenses can also result in vignetting (where the corners darken). On the other hand, very large f-stop numbers (f11 and above), diffraction in the lens will cause the pictures to soften considerably.
ISO
The third parameter that you can play with is the ISO setting (which controls the sensitivity of the sensor). Setting the ISO to a larger value will increase the sensitivity of the sensor (which is mostly a good thing), but it will also increase the noise in the photograph (a bad thing). For point and shoot cameras, higher ISO values will almost always result in very visible noise. With SLRs and their larger sensors, they can often shoot very clean photos at higher ISO settings. This is one area where newer cameras are making huge advances ... clean pictures at high ISOs. With my Canon 5D Mark II, I feel very comfortable taking photos up to ISO 800, and even at ISO 3200 I find the photos to be usable.
How To Adjust Camera Settings
When I take pictures, 95% of the time I shoot in aperture priority (“A”) mode. I like to take pictures with shallow depth of field to isolate the subject, so I usually have the aperture set to near the smallest number (i.e. widest aperture). I let the camera choose the shutter speed, although I keep an eye on the shutter speed to see if I think it is too slow, and if it is, then I adjust the ISO to a higher value. Usually I set the ISO based on the lighting and subject of the photo before I start shooting, and I don’t often adjust it while shooting.
I prefer to keep my photographs as simple as possible, and try to isolate a single subject. However, when taking photographs with multiple subjects (two friends playing, a group shot, etc.), getting the depth of field right is more tricky. If you shoot wide open (small f-stop number), the depth of field will be very shallow and if your subjects are at different distances from the camera, you will probably find some of them will be out of focus. In this case, you will need to set a larger f-stop number in order to get a large enough depth of field to get everyone in focus.
One other situation that may require a larger depth of field is with moving subjects. When the subject is moving towards or away from the camera, most non-professional cameras have a very hard time focusing. The small delay between achieving focus and taking the picture will generally result in focus errors. Professional cameras actually analyze how fast the subject is moving and adjust the focus so that it will be correct when the photo is taken. These cameras generally cost $5000+, so for the non-professional we need to find other ways to avoid blurry photos. The easiest way to avoid blurry photos in these circumstances is to use a larger f-stop value to give a deeper depth of field. This does not help with the focus error, but it does reduce the margin of error. By having a larger depth of field, more of the photograph will be in focus, and the greater the chance that your subject will still be in focus.
When I’m not shooting in “A” mode, it is usually because I am looking for a large depth of field. In this case, I usually choose “Tv” mode, and set the shutter speed to the minimum value that I think I need to keep the shot in focus. The camera will then use a large f-stop (small aperture) which will result in increased depth of field. In this mode, I generally watch the aperture setting to make sure that the f-stop doesn’t get too large (for diffraction / sharpness reasons that I described above), and if it does, I choose a faster shutter speed.
For challenging lighting situations, the camera may not be able to decide what to optimize the exposure for, and the automatic settings may not work well. An example of this is when your subject is back-lit (i.e. there is a bright light behind the subject). In this case, one thing that you can do is to use an exposure mode on your camera called “spot mode” which exposes the shot based on the spot at the centre of the photograph rather than the entire frame. Another option is to use exposure compensation, and “over-expose” the photo.
Another example is walking on the beach during a sunset. If you expose the sunset properly, the subject will often be too dark. If you expose your subject properly, the sunset will be overexposed and lose all its beautiful colours. You need to decide which you want, and for a sunset this is generally to expose the sunset properly and leave your subject as a silhouette. One way to do this is to point your camera at the sunset, press the shutter half way to see the best exposure for the sunset, and then either keep the shutter pressed half way and reframe your photo, or to manually adjust the exposure to replicate the settings you saw. To manually adjust the exposure, either use “M” mode, or use exposure compensation.
Two more bits of advice when shooting in challenging lighting. One is to use bracketing (either the camera mode or manually). By this I mean taking pictures at various exposures so that you can choose the best one when you get home and look at the photos on your computer. Another is to use the “RAW” file setting on your camera. When your camera takes a photo, it generates colour information for every pixel in the photograph. The data generated is in a different format than typical image formats like jpg, and there is generally a lot more data stored in the RAW photo than can be stored in a jpg. As a result, when the RAW data is converted to a jpg image, information is lost, and that information makes it harder to adjust the image on your computer. If you get the exposure wrong when you take the photo, a RAW file will allow you to adjust the exposure on your computer with very little loss in quality.
One other time that RAW photos help is with white balance. Different types of lighting have different colour biases to them. Our eyes automatically adjust to these colour biases, and our brains automatically adjust what we see so the colours look normal. The camera needs to do the same thing to make the pictures look right. Modern cameras are pretty smart and can get this information correct most of the time. They typically analyze the light that they see, and guess that the lighting is either “daylight”, “fluorescent”, “incandescent”, etc. Sometimes the camera gets it wrong. When shooting jpg images, the camera adjusts the image according to its best guess for the white balance, and saves that in the jpg image. With a RAW file, you have the original data and you can adjust the white balance on your computer with no loss in quality. You can do the same with jpg files, but you will notice a loss in colour quality. Here is an example of white balance adjustment on a raw image. If the original photo was taken as a jpg, the colours would not be nearly as deep in the adjusted image.


One final technique for the enthusiast to use in challenging lighting is HDR photography. I won’t go into many details here, but basically this involves taking multiple photos with some over-exposed and some under-exposed. Special software can then take the stack of photos and merge them together by using the over-exposed shot for the dark regions of the photo and the under-exposed shot for the bright regions of the photo. The result can be stunning for those willing to play around with the photos on the computer. The only complication for taking HDR photos is that they work best when using a tripod on non-moving subjects. If you are interested in HDR photos, do a google search. When done well, the results can be stunning!
Composition
Besides getting the exposure correct, how you compose your photograph has a huge impact on the final result. Unlike with exposure, there are no real hard rules or formulas, and a lot of it comes down to personal tastes. I can mention a few things that I like to keep in mind when I take photographs.
For me, the most important thing that I learned about my photographs is that the simpler the picture, the more I like the result. If I try to put too much detail into a photograph, I find that nothing stands out. For me, a good photograph has a simple idea as to what it is trying to take a picture of, and focuses as much of your attention on that aspect as possible. It took me a long time to realize this as it is often different from how your eyes perceive a real life situation. For example, while travelling in India, a busy market is fascinating to look at. Your eyes dart around noticing all of the colors, people, animals, items for sale, etc. However, when taking a picture of that market, if you try to take a picture of everything, the end result is generally not that interesting. Instead, I try to find interesting aspects of the market that are interesting, and then compose the picture to emphasize those aspects. For example, focus the picture on a single vendor negotiating with a customer, or a pile of spices, or some bananas stacked against a wall.
When taking people photographs, I try to have a single subject and to focus on that subject as much as possible. If I’m at my daughter’s school party for example, I usually try to take photos of one child at a time.
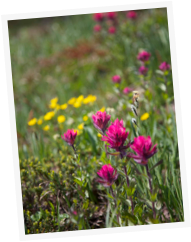
Besides the subject, the background of your photograph is extremely important. I usually try to isolate that subject in the photograph, and blur the background by using a shallow depth of field (I probably over-use this technique). Blurring the background helps focus on the subject, but you still need to be careful about what the background will be. If you have the freedom to position your subject or yourself, try to think about what the background is and to choose a background that will be as subtle as possible. For example, a large flashy billboard behind your subject will draw the attention of the people looking at your photograph. On the other hand, if there is a wall of a single colour, or some trees or bushes in the background, a shallow depth of field will blur the background nicely resulting in a background that is pleasing to look at while not being distracting.
The angle at which you take the photograph is also very important. For small children, you will often get better photographs if you lower yourself down to their level rather than taking a picture looking down at them. Sometimes even lying down on the ground and looking up at the children can provide an interesting and unusual perspective.
Another thing to take into account is the boundaries of your photograph. If you are taking the picture of most of a person, make sure that you do not cut off their feet at the bottom or the tops of their heads at the top. Try to leave a bit of empty space around your subject ... if the subject is cropped too tightly it can give a cramped feel to your photograph. Having a looser cropping also gives you more freedom on your computer to re-frame the photo the way you like.
If you have a zoom lens, you can also play with the focal length to change the composition of your photograph. Zooming out to a larger focal length will appear to bring the background in closer. For example, if you are taking a picture of someone standing in front of a mountain, adjust your zoom so the mountain is the size that you want, and then position your subject and / or yourself so that the subject is the size you want by adjusting the distance between yourself and the subject.
Lighting is also extremely important! In general, you should avoid back-lit situations. When taking pictures outdoors, look at your shadow. In general, your shadow should be pointing in the direction of your subject plus or minus 45 degrees or so. I actually like to have the sun providing light a little to one side (i.e. behind me, but not directly behind me) as I find it provides more interesting shadows. When taking pictures indoors, try to avoid having lights be directly in your photographs as they will either look washed out, or they will cause your subject to be underexposed.
If taking pictures outdoors and you have the choice of the time of day, try to have the sun be low in the sky. In the tropics, there is a very short window of good lighting, while up north in the late fall / winter / early spring, the sun is low enough during most of the day to provide nice lighting. When taking pictures with a high sun, try to take the pictures without any sunlight at all if possible. If you do need to take a picture with the subject back-lit, try using the flash to brighten up your subject.
When taking pictures indoors, I try to avoid using a flash (or if I use one, I try to bounce the light off of a ceiling). The built-in flashes on a camera tend to flatten a picture by removing all of the shadows, the lighting tends to be harsh, and often the background will end up being too dark. You will need a “fast” lens in order to be able to do this (see below under equipment).
As you get more comfortable with your photography, try to experiment more with challenging lighting. For example, the sun shining on someone’s back can provide an interesting “glow” if you can keep the background from being too bright. Recognizing good and bad lighting is one of the most important skills in photography.
Camera Choice
For the camera itself, every camera has different features, and these features are going to be important to some and not to others. For most beginners, any modern entry level SLR will be a good starting point. For myself, two of the most important features are sensor size and light sensitivity.
SLR cameras these days come in crop sensors (sensors that are 1.6x smaller in both width and height compared to a 35mm film camera). Full frame sensors have an image sensor that is about the same size as 35mm film. A full frame sensor has two advantages. One is that most lenses were designed in the film era, and they are designed to be used on full frame cameras. This is changing rapidly for entry level lenses as Canon and Nikon are designing special lenses that can only be used on crop cameras to “fill in the gaps”.
Light sensitivity is better on larger sensors, and it is also better on more modern sensors as this is one area where technology is improving rapidly. Improved light sensitivity allows you to use higher ISO settings without having the pictures be too noisy. This can be very helpful when taking pictures indoors without a flash.
That being said, full frame cameras are still extremely expensive, and I don’t recommend them until you are become very serious about photography. For most people, an entry level SLR is the best way to go, and if you want to spend more money, it is probably better spent on better lenses (see below).
For a full SLR, I would recommend either Canon or Nikon. Both make very good cameras. I am biased towards Canon, although from what I’ve read, Nikon might be making better cameras right now (this changes every few years as they keep leapfrogging each other in technology).
One other interesting camera that I would like to mention is the Olympus or Panasonic “micro four-thirds” cameras. These are cameras that are the size of a large point and shoot camera, but have interchangeable lenses and a large image sensor. We have been using one (the Olympus E-PL1), and paired with the Lumix 20mm f1.7 “pancake” lens, it takes amazing photographs (sharper and better colour than a full SLR with a kit lens).
Lens Choice
The lens used has a far bigger impact on image quality than a camera does. A good lens provides sharper images, and often has a larger maximum aperture (smaller f-number) which allows more light in and shallower depth of field when you need it.
Zoom lenses are very convenient, and can be very useful, but making a zoom lens definitely reduces the sharpness of the images, and often the largest aperture is not that large which puts you at a disadvantage during low light or if you want a shallow depth of field.
I strongly recommend anyone who is remotely serious about photography to have at least one prime lens (by prime, I mean a fixed-focal length non-zoom lens). For crop cameras (i.e. all SLRs that cost less than $2500), the ideal starting prime is the cheapest 50mm lens available. Both Canon and Nikon have one that sells for about $100. The 50mm lens is cheap, light, amazingly sharp, great for taking low light photographs, and when shot wide open, it has a very shallow depth of field. This focal length on a crop camera is often considered an ideal focal length for taking portraits. When I first tried this lens, I couldn’t believe the difference in the look and feel of the photos I took.
Even if you really like the utility of zoom lenses, I strongly recommend that you pick up at least the inexpensive version of the 50mm lens. If you are ever taking portrait shots, or are indoors and need to take photos without the flash, you will find the 50mm will give much better results.
One other feature that is becoming more common on lenses is image stabilization (IS for Canon, VR for Nikon). IS lenses use gyroscopes to reduce the impact of the movement of the camera due to unsteady hands. In the section above, I said that with a 60mm lens, you should try for a shutter speed about 1/60 of a second. With IS, you can often get away with a much slower shutter speed ... maybe even down to 1/8 of a second and still get sharp photos. However, keep in mind that IS only helps with camera shake, and has no impact at all on motion blur due to your subject moving.
One nice thing about lenses (as opposed to cameras) is that they depreciate very slowly. This means that if you buy a lens and use it for a year and decide it is not a lens you really need, you can sell the lens on eBay for about 90% of what you paid for it.
If you want to learn more about the lens choices for Canon, I recommend this website:
http://www.the-digital-picture.com/Canon-Lenses
Blurry Photos
One common problem when taking photographs of children is blurry photos. To try to get sharp photos, it is important to try to understand the reason for a picture being blurry in the first place.
One reason that a picture might be out of focus is due to motion blur (the subject is moving, and the shutter speed is not fast enough to freeze the action). If this is the problem, then the solution is to use a faster shutter speed. This can either be done by using a smaller f-number (aperture) setting, or by using a higher ISO setting.
The other reason for blurry photos is due to the shot being out of focus. SLRs generally have very good auto-focus capabilities. However, there is usually a delay between when focus is achieved and when the picture is actually taken. If the subject is moving towards you or away from you, the focus in the camera will probably be off. There are two things that you can do to help with this. The first thing is to use the special focus mode that tries to predict the movement of your subject. In my camera, this is called “AI-Servo” mode. With this setting, the camera tries to calculate how fast and in what direction your subject is moving, and adjust the focus accordingly.
Another tool for helping with out of focus shots is depth of field. If you make the depth of field larger, the focus has a larger margin of error, and your subject is more likely to be within the region of the photo that is in focus. Note that this is the opposite of what you want to do for motion blur as you make the depth of field larger by increasing the f-number which will cause a slower shutter speed and will increase motion blur. However, if you are outdoors in bright light, you can probably get away with high shutter speeds and large f-numbers.
A final way of dealing with out of focus shots is to avoid situations where the subject is moving towards or away from you. If the subject is moving left to right, the focus is more likely to be correct since the distance between you and your subject is not changing.
Examples
Here are some examples of some photos that I have taken that I like:
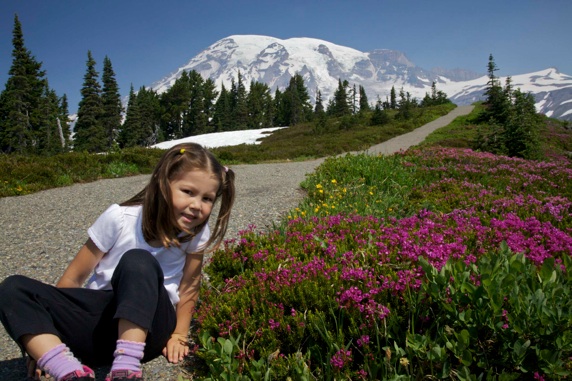
I took this photo while lying on my stomach to get the flowers in the foreground and Mount Rainier in the background. I used a large f-number to help get everything in focus.
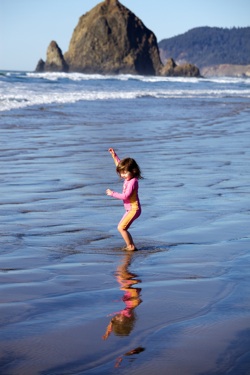
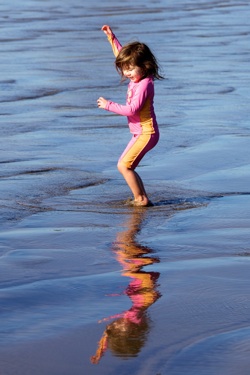
I took the picture on the left of Tiana at Canon Beach. After taking the picture, I liked the reflection of Tiana in the wet sand, so I re-cropped the photo to focus on just Tiana and her reflection.
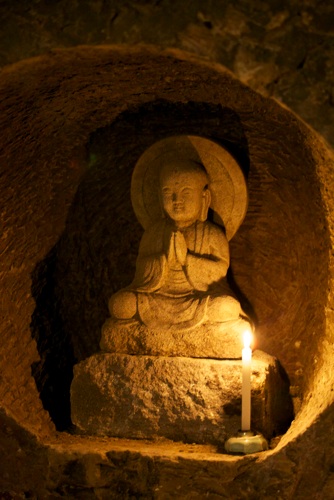
A statue in a cave in Kamakura, Japan. Taking the picture without a flash gives a nice atmosphere.

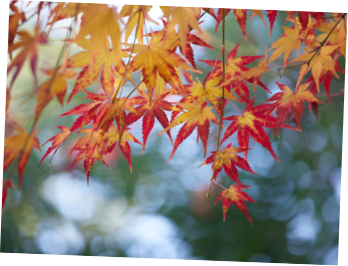
I found this tile interesting, and I liked the moss in the background. This is an example of picking one detail and focusing on it. The entire temple was pretty to look at, but I don’t think it would have made an interesting photo.
This is an example of backlighting that I think turned out well. I like the glow in Tiana’s hair.
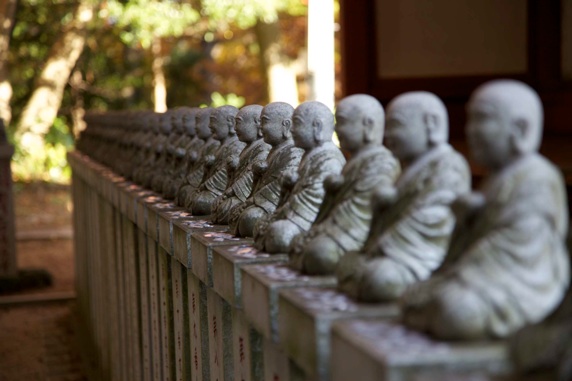
I liked the repetition of these status at a Japanese temple. I used a shallow depth of field and set the focus so the statues started and ended out of focus. This is another example of picking a small detail and focusing on it.

I thought the roots of this fallen tree were interesting, and I like the way that they focus your attention on Karuna who is standing at the source of the roots.
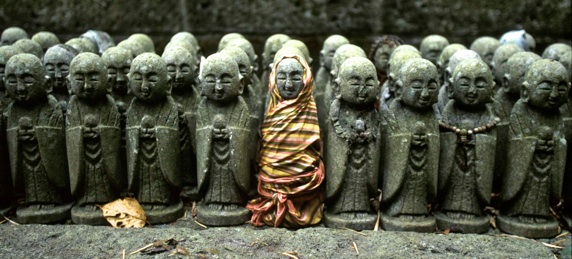
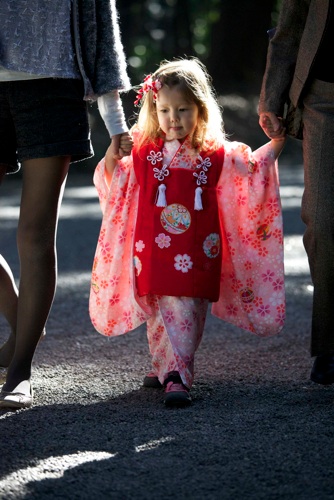
Another example of picking a detail. I liked that this one statue was dressed up.